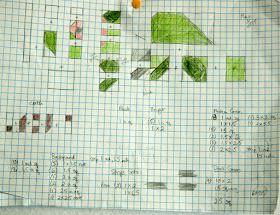
Well, time to get back to work. The chameleon quilt was accepted into the Northwest Quilting Expo...and since they insist on finished quilts...back to the sewing machine I go...after a bit of pin basting of course. In the meantime, I thought I would show the plans for the chameleon. I knew what I was going to do to make the pairs of chameleons when I started. The layout and sashing was figured out on the fly.
This is the cartoon of the third (and final) version of the chameleon pattern.
Next I deconstruct the cartoon to make a sewing plan. And there is sometimes a bit of back and forth...if something is hard to construct I might simplify the design or adjust it if I find myself struggling with points or matching seams. I also figure out the cutting requirements.
And sometimes once I have a block constructed, I can refer to that to help me construct new ones. However, the chameleon tail got too confusing so I made this step-by-step plan. Each grid square represents one-finished inch, so the first flip triangles are made from one-inch squares. Hmm...does anyone see the influence of microspools here?
So anyone is free to use this pattern, but I won't be making a tutorial for this. Although who wouldn't want to start a pattern with instructions that say: Cut ten 1 inch squares of background fabric...


Congrats on getting accepted - good luck finishing! And I seem to be one who chooses patterns and THEN realizes it starts out with "cut 10 1" squares of background", but by then I'm in love with the pattern, so I forge ahead!
ReplyDeleteIt is fascinating to see your process. Thanks for showing these sketches.
ReplyDeleteThank you for sharing your design process! It is fun to see!
ReplyDeleteYou are so very talented. I imagine Molly and Buddy give you inspiration. Good luck in the quilt show. I’m thinking that’s a winner.
ReplyDeleteHHHHhhhMMMmmmm… "figured out on the fly" … I think you need some flies in the border, those guys will get HUNGRY!
ReplyDelete