Showing posts with label pieced bunny. Show all posts
Saturday, August 1, 2015
Bounding bunnies
For August, the Rainbow Scrappy Challenge celebrates indigo, blacks and grays. So I ran around the sewing room and caught some bunnies that might qualify. And I'd like to add that its much easier to grab a standing bunny than these silly hopping ones.
Saturday, May 23, 2015
Green Bunnies
It's the month for green at the Rainbow Scrappy Challenge. But spring is running somewhat late in my sewing room this year, so we are still transitioning from purple bunnies to green ones.
Originally I had planned to make bunnies that could run in two directions, but until this week all of them were running to the left. As you can see, everything gets more interesting with more colors and directions.
And I know that some of you are a bit concerned that the owls might eat all of the rabbits. However, I have discovered that I can't always predict which way things will go in my sewing room.
Originally I had planned to make bunnies that could run in two directions, but until this week all of them were running to the left. As you can see, everything gets more interesting with more colors and directions.
And I know that some of you are a bit concerned that the owls might eat all of the rabbits. However, I have discovered that I can't always predict which way things will go in my sewing room.
Saturday, March 7, 2015
Yellow bunnies
We're getting ready for spring with yellow bunnies. Hope they are faster than the red fox. To see more yellow...the color for March at the Rainbow Scrappy challenge...hop along to the Superscrappy blog.
Tuesday, February 17, 2015
How to make a bunny
This rabbit puppet followed me home from Santa Rosa, CA. And he is not very happy with his new home. He thinks Nurse Vulture is scary, and he doesn't like kittens or fish. I'm not exactly happy with the rabbit puppet either because apparently all rabbits like to do is make rabbits. So today, Rabbit is going to show you how to make rabbits.
This is the bunny that we're making. Rabbit has been reading Mystic Quilter's blog and thinks her hydrangeas look delicious. So one of the pink fabrics is a hydrangea floral.
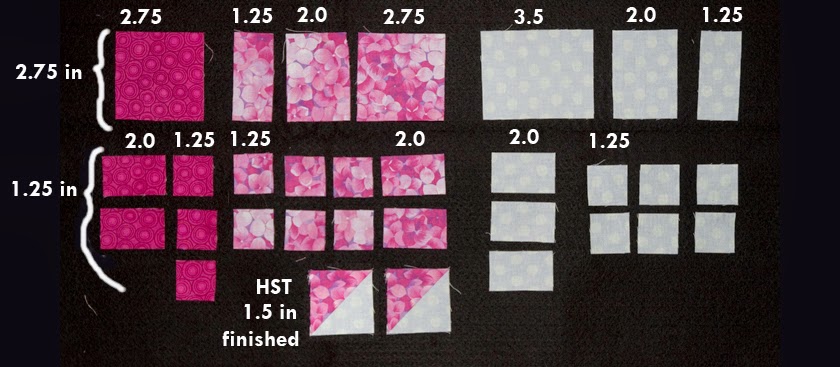
First, you will need a background fabric, and also a darkish and lightish color.
This block is based on a .75 inch grid and the finished block will be 6.5 inches wide and 6 inches tall.
This may look like a lot of pieces, but I prefer to use flip triangles whenever I can. As you can see, there are only 2 half-square triangles used to make this bunny, and all the other triangles you see are made by sewing a square in the corner, sewing on the diagonal and then ironing over the flap to make the triangle, like for a snowball block.
Here I have laid out all the pieces as they will be sewn together and I have combined the simplest elements. For example, the bunny's head is the 2.75 inch light pink square. I have attached two 1.25 inch background squares to shape the bunny's nose.
And in this step, I'm just sewing more of the elements together.
Hopefully at this point, the bunny shape is recognizable. And this shows the four basic shapes that combine to make the bunny.
And here are the last two sections before they are joined.
And that's how Rabbit make rabbits.
This is the bunny that we're making. Rabbit has been reading Mystic Quilter's blog and thinks her hydrangeas look delicious. So one of the pink fabrics is a hydrangea floral.
First, you will need a background fabric, and also a darkish and lightish color.
This block is based on a .75 inch grid and the finished block will be 6.5 inches wide and 6 inches tall.
This may look like a lot of pieces, but I prefer to use flip triangles whenever I can. As you can see, there are only 2 half-square triangles used to make this bunny, and all the other triangles you see are made by sewing a square in the corner, sewing on the diagonal and then ironing over the flap to make the triangle, like for a snowball block.
Here I have laid out all the pieces as they will be sewn together and I have combined the simplest elements. For example, the bunny's head is the 2.75 inch light pink square. I have attached two 1.25 inch background squares to shape the bunny's nose.
And in this step, I'm just sewing more of the elements together.
Hopefully at this point, the bunny shape is recognizable. And this shows the four basic shapes that combine to make the bunny.
And here are the last two sections before they are joined.
And that's how Rabbit make rabbits.
Subscribe to:
Posts (Atom)