How about a fatter face...not usually something that you ask for from a plastic surgeon. When looking at images of real sheep, their heads are thin, but there neck creates an extra ruff...that gives the appearance of a fatter head.
In this case, I brought the nose and eyes lower. For realism, the nose should be lower but the eyes should be higher. This arrangement is more dog-like, but cuter. Yet definitely not a sheep dog.
Thursday, January 19, 2017
Wednesday, January 18, 2017
Sheep 1.0
The sheep is feeling a lot better after her surgery. She is also happy to have full use of her legs. I'm hoping that by tomorrow she will be feeling well enough to go outside.
Then I wondered if her nose needs to be lower and maybe the top of her head flatter. But then she thinks she has wolf ears. Not a good look for sheep. (P.S. This version of the sheep is a Photoshop creation.)
Tuesday, January 17, 2017
Chicken tutorial: right facing
Today I thought I would finish the speedy chicken tutorial by showing the right facing chicken. I showed how to make the left facing chicken here. The fabric requirements are exactly the same--basically what changes is the direction of the flip triangles.
This chicken is based on a one inch grid, that is you will be using 1.5 inch, 2.5 and 3.5 inch strips.
For the fabric, I used a dark purple fabric for the wing and a lighter purple fabric for the body. The wattle and comb in this tutorial is red, and the beak is yellow. And I used a light beige for the background.
Fabric Requirements:
Background
one 2.5 by 4.5 inch rectangle
two 2.5 inch squares
four 1.5 by 2.5 inch rectangles
one 1.5 by 4.5 inch rectangle
three 1.5 inch squares
Yellow beak
one 1.5 inch square
Red Wattle and Comb
four 1.5 inch squares
Light Purple (Body)
one 3.5 inch square
one 2.5 by 4.5 inch rectangle
two 2.5 inch square
three 1.5 inch squares
Dark Purple Wing/Tail
one 4.5 by 5.5 inch rectangle
one 1.5 inch square
I make the wing first. This uses a 2.5 inch beige square in the lower right corner and a 2.5 inch light purple square in the lower right corner. There is also a 1.5 inch light purple square in the upper right corner. By making the wing first, I can use the trimmed triangles to cut partial 1.5 inch squares for other parts of the chicken.
Here you can see the chicken parts laid out to sew the flip triangles. The flip triangles for the back and tail are taken from the wing's waste triangles. Sew as indicated by the broken lines.
Here is the chicken after sewing and ironing all of the flip triangles.
Next, sew the components as indicated by the arrows: The tail to the back, a comb to the 1.5 inch light purple square, two combs together, and the beak to the 1.5 inch beige square.
Oh egads. I forgot to mention that you should shut the barn door before you begin. And who tied together the hind legs of that poor sheep? Not only that, she has a big square gash in her cheek. I am, however, intrigued with the potential for sheep-dyed yarn.
Let's get back to the purple chicken. This is how she looks after the last sewing steps. Now sew the beak to the face, sew the two comb piece to the 2.5 inch beige square, and sew the single comb piece to the chicken's back.
And finally, we're to the last four steps. First sew the two comb component to the top of the chicken's head. Second, sew the chicken breast under the chicken's head. Third, sew the chicken's back to its wing. And last, sew the front of the chicken to the back.
SQUIRREL!
Hopefully, without further distractions, you have made a right-facing chicken. And in case you were wondering, this blog post was carefully supervised by Buddy.
Yesterday, I layered a quilt without Molly's supervision. She was less concerned with flaws in the pig quilt, but was very concerned with flaws in the quilter. So much of the day I have received extensive pet therapy. It looks and feels a lot like having a cat sleep in your arms, but I'm sure this just reflects my ignorance.
This chicken is based on a one inch grid, that is you will be using 1.5 inch, 2.5 and 3.5 inch strips.
For the fabric, I used a dark purple fabric for the wing and a lighter purple fabric for the body. The wattle and comb in this tutorial is red, and the beak is yellow. And I used a light beige for the background.
Fabric Requirements:
Background
one 2.5 by 4.5 inch rectangle
two 2.5 inch squares
four 1.5 by 2.5 inch rectangles
one 1.5 by 4.5 inch rectangle
three 1.5 inch squares
Yellow beak
one 1.5 inch square
Red Wattle and Comb
four 1.5 inch squares
Light Purple (Body)
one 3.5 inch square
one 2.5 by 4.5 inch rectangle
two 2.5 inch square
three 1.5 inch squares
Dark Purple Wing/Tail
one 4.5 by 5.5 inch rectangle
one 1.5 inch square
I make the wing first. This uses a 2.5 inch beige square in the lower right corner and a 2.5 inch light purple square in the lower right corner. There is also a 1.5 inch light purple square in the upper right corner. By making the wing first, I can use the trimmed triangles to cut partial 1.5 inch squares for other parts of the chicken.
Here you can see the chicken parts laid out to sew the flip triangles. The flip triangles for the back and tail are taken from the wing's waste triangles. Sew as indicated by the broken lines.
Here is the chicken after sewing and ironing all of the flip triangles.
Next, sew the components as indicated by the arrows: The tail to the back, a comb to the 1.5 inch light purple square, two combs together, and the beak to the 1.5 inch beige square.
Oh egads. I forgot to mention that you should shut the barn door before you begin. And who tied together the hind legs of that poor sheep? Not only that, she has a big square gash in her cheek. I am, however, intrigued with the potential for sheep-dyed yarn.
Let's get back to the purple chicken. This is how she looks after the last sewing steps. Now sew the beak to the face, sew the two comb piece to the 2.5 inch beige square, and sew the single comb piece to the chicken's back.
And finally, we're to the last four steps. First sew the two comb component to the top of the chicken's head. Second, sew the chicken breast under the chicken's head. Third, sew the chicken's back to its wing. And last, sew the front of the chicken to the back.
SQUIRREL!
Hopefully, without further distractions, you have made a right-facing chicken. And in case you were wondering, this blog post was carefully supervised by Buddy.
Yesterday, I layered a quilt without Molly's supervision. She was less concerned with flaws in the pig quilt, but was very concerned with flaws in the quilter. So much of the day I have received extensive pet therapy. It looks and feels a lot like having a cat sleep in your arms, but I'm sure this just reflects my ignorance.
Monday, January 16, 2017
Layered Piglets
There was a sewing room miracle this afternoon. The piglet quilt was layered without the utterance of a single swear word.
Of course, I am certain that the workmanship is lacking because I layered the quilt while the quilt inspector was sleeping.
Sunday, January 15, 2017
Saturday, January 14, 2017
Purple chicken and spools
I posted the chicken tutorial yesterday, so I thought I would add a purple chicken to the mix. This one is left-facing, however. She is very interested to find out what others are making with purple over at the Rainbow Scrappy Challenge.
Purple chicken also got to meet her right-facing sister.
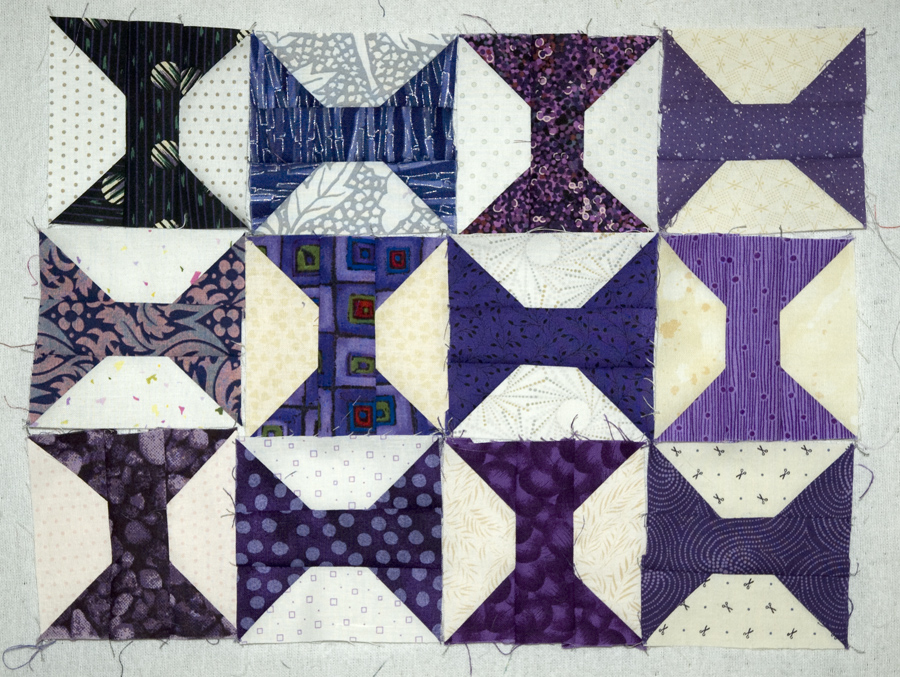
And count me in for the spool party.
Purple chicken also got to meet her right-facing sister.
And count me in for the spool party.
Friday, January 13, 2017
Chicken Tutorial
This is the tutorial for a left-facing chicken block that finishes to 7 by 9 inches. This chicken is based on a one inch grid, that is you will be using 1.5 inch, 2.5 and 3.5 inch strips. I plan to also provide a tutorial for a right-facing chicken as well. And you may be surprised how quickly this comes together.
For the fabric, I used a dark fabric for the wing and a lighter fabric for the body. The wattle and comb in this tutorial is red, and the beak is yellow. And I used a light beige for the background.
Fabric Requirements:
Background
one 2.5 by 4.5 inch rectangle
two 2.5 inch squares
four 1.5 by 2.5 incd rectangles
one 1.5 by 4.5 inch rectangle
three 1.5 inch squares
Yellow beak
one 1.5 inch square
Red Wattle and Comb
four 1.5 inch squares
Light Brown (Body)
one 3.5 inch square
one 2.5 by 4.5 inch rectangle
two 2.5 inch square
three 1.5 inch squares
Dark Brown Wing/Tail
one 4.5 by 5.5 inch rectangle
one 1.5 inch square (see frugal tip below)
This is what all the cut pieces look when laid out in their corresponding part of the chicken. This block uses a lot of flip triangles...squares placed in the corner, sewn along the diagonal, ironed back to make a triangle, then bottom two layers are trimmed away.
This is also what all the cut pieces look like when laid out, but this time all of the squares for making flip triangles are laid on top of their base. The first step in sewing this chicken is to sew all of the flip triangles.
This is what the chicken looks like after you've sewn all of the flip triangles.
But wait. I know there are some of you that hate the waste of flip triangles. And worse, for the dark fabric, there is a 4.5 by 5.5 section and then a lousy 1.5 inch square. Well, if you sew the large flip triangles first using the 2.5 inch squares, then when you trim away the lower layers, you can use those triangles for small flip triangles. I usually go ahead and trim the waste triangle down to look like a square as shown in the photo so I can line it up better. But remember that the corners don't line up. You want the corner of the small triangle facing away so you can iron it back into place once its sewn on.
Now that we've finished all the flip triangles, we're just going to sew the small chicken hunks into larger hunks. Using chain piecing, you can sew two wattle pieces together, add a brown 1.5 inch square to the bottom of a wattle piece, sew a 1.5 inch background square to the bottom of the beak and sew the long tail piece onto the chicken's back.
At this point you may want to stop because some people like their chickens in parts...for example chicken wings or the breast. However, if you prefer a whole chicken, you should sew the front of the wattle to the 2.5 inch square of background, sew the other wattle component to the back of the chicken, and sew the beak onto the chicken's face.
We are so close to having a final chicken that you may hear clucking. Don't expect eggs yet though. First, sew the wattle to the head. Next sew the breast piece to the bottom of the head. Then, sew the back of the chicken to the wing section. Then the final seam is when you sew the front section to the back section.
Buddy says "Yum!"
For the fabric, I used a dark fabric for the wing and a lighter fabric for the body. The wattle and comb in this tutorial is red, and the beak is yellow. And I used a light beige for the background.
Fabric Requirements:
Background
one 2.5 by 4.5 inch rectangle
two 2.5 inch squares
four 1.5 by 2.5 incd rectangles
one 1.5 by 4.5 inch rectangle
three 1.5 inch squares
Yellow beak
one 1.5 inch square
Red Wattle and Comb
four 1.5 inch squares
Light Brown (Body)
one 3.5 inch square
one 2.5 by 4.5 inch rectangle
two 2.5 inch square
three 1.5 inch squares
Dark Brown Wing/Tail
one 4.5 by 5.5 inch rectangle
one 1.5 inch square (see frugal tip below)
This is what all the cut pieces look when laid out in their corresponding part of the chicken. This block uses a lot of flip triangles...squares placed in the corner, sewn along the diagonal, ironed back to make a triangle, then bottom two layers are trimmed away.
This is also what all the cut pieces look like when laid out, but this time all of the squares for making flip triangles are laid on top of their base. The first step in sewing this chicken is to sew all of the flip triangles.
This is what the chicken looks like after you've sewn all of the flip triangles.
But wait. I know there are some of you that hate the waste of flip triangles. And worse, for the dark fabric, there is a 4.5 by 5.5 section and then a lousy 1.5 inch square. Well, if you sew the large flip triangles first using the 2.5 inch squares, then when you trim away the lower layers, you can use those triangles for small flip triangles. I usually go ahead and trim the waste triangle down to look like a square as shown in the photo so I can line it up better. But remember that the corners don't line up. You want the corner of the small triangle facing away so you can iron it back into place once its sewn on.
Now that we've finished all the flip triangles, we're just going to sew the small chicken hunks into larger hunks. Using chain piecing, you can sew two wattle pieces together, add a brown 1.5 inch square to the bottom of a wattle piece, sew a 1.5 inch background square to the bottom of the beak and sew the long tail piece onto the chicken's back.
At this point you may want to stop because some people like their chickens in parts...for example chicken wings or the breast. However, if you prefer a whole chicken, you should sew the front of the wattle to the 2.5 inch square of background, sew the other wattle component to the back of the chicken, and sew the beak onto the chicken's face.
We are so close to having a final chicken that you may hear clucking. Don't expect eggs yet though. First, sew the wattle to the head. Next sew the breast piece to the bottom of the head. Then, sew the back of the chicken to the wing section. Then the final seam is when you sew the front section to the back section.
Buddy says "Yum!"
Subscribe to:
Posts (Atom)