Wednesday, July 31, 2019

Chameleons continue...

Here are the six new chameleons...

There was some discussion about whether this chameleon needed to be quarantined in case of possible contagion. But my suggestion is that one is better off ignoring the advice of chameleons.

I just try and mind my own business manipulating chameleon spores in the laboratory.

Monday, July 29, 2019

Chameleon emergence

Today I learned that chameleons emerge out of the ground like a cicada. Today I wondered why I haven't made a cicada quilt.

Sunday, July 28, 2019

Chameleon Collective

Here are four more chameleons.

Here is the full collective so far...I am aiming for 50 chameleons (or 25 pairs).

And these are the chameleon spores. Full chameleons coming soon...

Tuesday, July 23, 2019

No Gratitude

Molly will be celebrating her birthday soon and I recently gave her a wool cat cave. Here is a photo of Buddy enjoying Molly's new bed. I received some comments that it was not fair for Molly to get toys and not Buddy. So tonight I gave Buddy his very own toy...

He didn't even bother to say Thank you.

Monday, July 22, 2019

Sunday, July 21, 2019

More chameleons

Here they are...two more chameleons.

And here is a bit of chameleon biology...which you may not have known. It begins with a four leaf clover...this transforms into four spirals...that turn into four chameleon tails. Next, the tails will grow a body to take it places...hopefully to find a nice snack.

Thursday, July 18, 2019

Alt Jane turns Tiny Tuesday

At the  time that I was making a Dear Jane quilt, I began making blocks of the same size that I am sure Dear Jane made but never put in her quilt. These may look familiar because I used these for the Tiny Tuesday blocks.

These are the alternative Dear Jane animal blocks that didn't make the cut to become Tiny Tuesday blocks. (And yes, most of these are just small versions of larger patterns I have made.)

Meanwhile, Molly is about to turn four years old. I have been giving her a variety of presents as a warm up exercise. Molly is a fiend for wool, so I got her this bed made from wool. She likes it a lot although its a bit big for her. But she thinks it would make a good costume if she wanted to be Buddy for Halloween.

She also received some mouse toys and some wool felted balls, but Buddy stole them and ran off with them.

Tuesday, July 16, 2019

Tiny Tuesday: Pink Piglet Goes Fishing

Welcome to Angela's Tiny Tuesday, Piglet edition. Today we're going to stuff a piglet into a 4.5 inch finished block. And for those of you who may be hyperventilating, there is a second option of a fish block...you know, in case you want the healthier option. That said, this little piggy isn't as hard at it looks and will come together faster than you may expect. So let's get started.

The Micro Piglet uses three fabrics: a background, a dark pink and a lighter pink. For the background fabric cut three 1.5 by 2 inch rectangles, two 1.5 inch squares, one 1 by 6 inch strips and two 1.25 by 5 inch strips.  (In the photo, the strips look the same width...but that was a mistake I made...please move on...).

For the light pink, cut six 1 inch squares, one 1 by 2 inch strip and a 1.5 by 3 inch rectangle.

For the dark pink, cut a 1 by 2.5 inch strip, four 1 inch squares and one 1.5 inch square.

 First, cut a one inch square off of the 1 by 6 inch strip. This will be used for the top of the pig's ear.

We will make the piglet's ear by taking the 1.5 inch square of dark pink fabric and using the 1 inch square of background fabric to make a flip triangle in the upper left corner and using a 1 inch square of light pink fabric in the lower right corner.

 A flip triangle is a square sewn diagonally in the corner and ironed over to make a triangle. After sewing, there are three layers of fabric, two of which have the tips removed to reduce bulk. 

In the second photograph, the ear is the bottom square on the far left.

And now let's do the most intense step...making a curled pig tail...this requires putting four flip triangles on a 1.5 inch square of background fabric. In this case, three of the flip triangles are 1 inch squares of dark pink and one is a one inch square of light pink. It's hard to see all the layers in the second photograph, but its the one at the top far left. 

The easiest approach is to attach a flip triangle, finger press it and trim, then add another flip triangle, finger press and trim etc. until the four flip triangles are sewn.

After that, it will be super easy to sew a one inch light pink flip triangle to each of the 1.5 by 2 inch background rectangles. But it matters very much which corner you attach it to. Two rectangles have the flip triangle on the top left side, and one has it on the top right side.

And now we'll use strip piecing to make sewing tiny pieces easier. Sew the 1 by 2.5 inch strip of dark pink to the one inch wide strip of background fabric. Right behind it sew on the 1 inch square of light pink. (Please note that at this point that longish strip is five inches because you cut an inch off of it in the first step.)

After sewing and pressing (lightly!), go ahead and cut the dark pink strip set from the light pink square. 

Cut the dark pink strip set into one 1.5 inch length (the pig's snout) and one 1 inch length (a pig leg). Cut the light pink strip set from the rest of the background strip...but save it for another step! 

The 1.5 inch strip set will be the piglet's snout. Sew another dark pink 1 inch square to the background side of the next strip set to make the piglet's feet. The third strip set with light pink is the piglet's back.

Sew the background strip remnant to the side of the pig tail...place it so the light pink is in the lower left corner. You can see this finished in the photo below...in the top right corner.

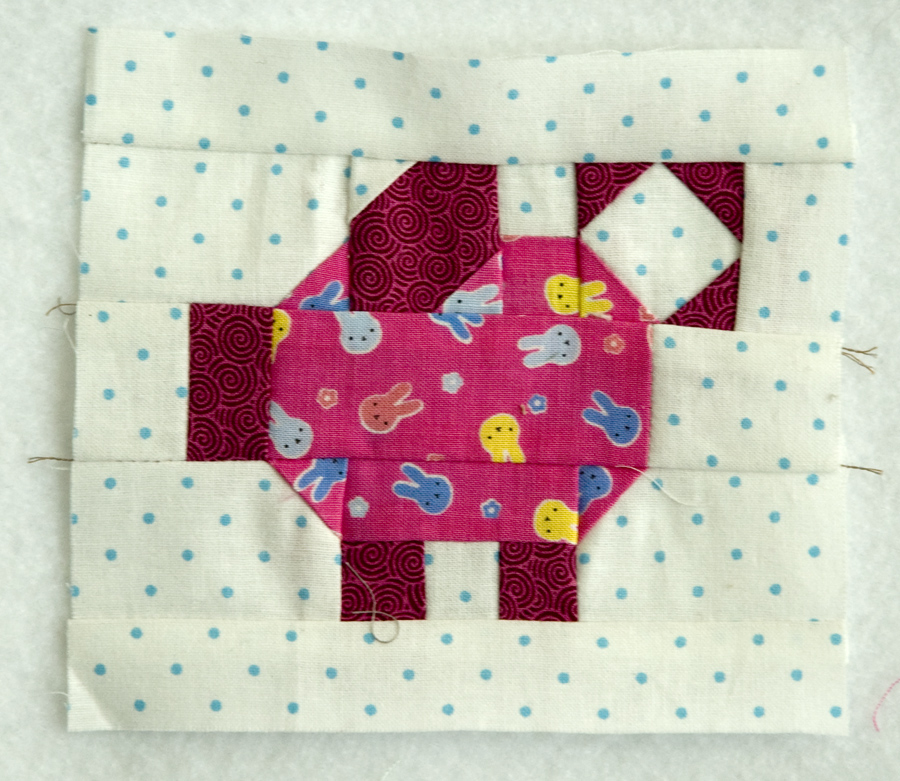
Rearrange all of your pieces and place them in their proper pig places as shown above.  After you complete this puzzle, you will sew the four seams with arrows pointing to them...that is, the forehead to the ear, the tail to the back, the nose to the body and the feet to the tummy.

Wow! The piglet is coming together fast! The next four seams are shown above with arrows: the back to the back of the ear, the 1.5 inch square of background to the body, the front of the tummy to the front leg section and the bacon to the back leg section.


Now sew the three piglet rows together.

Last but not least add the 1.25 by 5 inch strips of background fabric to the top and bottom to make the piglet five inches square unfinished. 

Now that was easier than you thought...wasn't it? If right about now you are screaming, crying or pouting...maybe you would prefer some fish...

And let's at least make TWO fish swimming in opposite directions.

You will be making TWO fish, so do this twice: cut six 1.25 inch squares of background fabric and a 2 by 2.75 inch rectangle of background fabric. From pink fabric, cut a 2.75 inch square and a 1.25 by 2.75 inch rectangle.

Using the 1.25 inch squares of background fabric, sew four flip triangles to the corners of the large pink square. Next sew two flip triangles to the 1.25 by 2.75 inch rectangle of pink. Watch the direction of the flip triangles...you want them to make a tail fin.

After ironing the triangles back and trimming, you will have three pieces for each fish...the body, the tail and some swimming room. And yes, I am showing how to make one, but for the Tiny Tuesday block you will need TWO fish.

Sew the body of the fish its tail. Then sew the large rectangle of background fabric to the fish's tail.
You should have two fish that can swim in either direction.

Keep watching the fish swim until you notice that the bottom fish has turned and has started to swim in the opposite direction. Catch them quickly and sew them together. 

You will now have your Tiny Tuesday block finished. And while you're pleased with your accomplishment, you might want to reconsider and make a piglet.  It's just a suggestion.

Monday, July 15, 2019

Chameleons

Here are four chameleons. This is the third version of the pattern. This version has a branch for the chameleons. They will connect up in the middle. I'm going to do that part later once I arrange the chameleons. Before that I think I will need to make 46 more chameleons.

Here's a closeup of a chameleon. I am using a one inch grid--that is the center of the eye, for example, finishes as one half inch.

Saturday, July 13, 2019

Pink Fish

Pink Fish. An excellent start to a quilt for a cat...or better yet a kitten. If you would like to get deeper into the pink, please skip over to the Rainbow Scrappy Challenge.

 And just in case you would like to see too much cute and naughty curled up in one.

And yeah, I might have to get a larger cutting table.


Friday, July 12, 2019

Tiny Friday

I'm slowly getting back into the groove of sewing again.  This bear paw is 4.5 inches finished and is part of Angela's Tiny Tuesday project over at SoScrappy.

I would like to say I have gotten my ducks in a row, but really I think it is only to escape all of the zucchini that has taken over the kitchen. Oh, and the lettuce, cucumbers and broccoli. And oddly, all of my neighbors have gone into hiding.

And here are all the chameleon guts that need to be cut into functioning chameleon parts. Meanwhile, Buddy is continuing to use this area as his playground.

And speaking of Buddy...he has officially become a cat. But not a lap sitting cat... He likes to be held up on my shoulder so I can't do anything else. He is going to have me registered as his support animal. He takes the idea of support literally. Buddy has also decided he likes racing through cat tunnels...even when there is a Molly Kitten sitting in it.

Molly is moving from Kitten status to Distraught Teen. She is overwhelmed by my idiocy. She spends most of the day (and night) trying to talk me into opening the front door so she can go outside. She can not figure out whether my not doing so is a sign of incompetence or part of a larger conspiracy.

Meanwhile, I am going to continue to focus on the chameleons despite the enticing eye candy over at Wanda's Exuberant Color.  Wanda is working on a fantastic version of a postage stamp quilt combining prints and solids, inspired by an equally wonderful version at the Klein Meisje Quilts blog.

Thursday, July 11, 2019

Patchwork Progress

Hey Buddy--

Get those cat pictures off of every computer and device. I can't believe that Senator Purrkley would send out twitter ads for shelter cats. Our staff has a very weak will.

Also, make sure to post some fabric-related nonsense for the quilters.

And please double check that you don't mix up these instructions and post pictures of stupid cats and delete everything quilt-related.

Respectfully,

Molly Kitten

Wednesday, July 10, 2019

Tuesday, July 9, 2019

Thursday, July 4, 2019

Chameleons 3.0

Here are the new versions of the chameleons. In this version they have something to stand on. Also, they are quite a bit smaller...the limb they are standing on is a one inch strip (half inch finished).

But I found a problem with my pattern. First, I make a cartoon on graph paper, and then I break down the piecing. During that translation I made a mistake so the chameleons definitely have problems with their digestion. Also, I think I will add some flip triangles to the front leg to round it off a bit.

And in case you are missing Molly... She is quite disappointed with me because I keep going outside. She realizes that there is more territory that she is missing out on and it happens to be a territory loaded with birds and bugs. I remind her it is also a territory full of cars and dogs and howling monkeys.

Right now I am waiting patiently for the first squash of the season. And yes, shortly I will be buried in it.

And this will be my second cucumber. It is a bit strange growing plants without sharing them with deer, raccoons, skunks, rabbits and voles. Yes, a bit lonely.