Welcome to
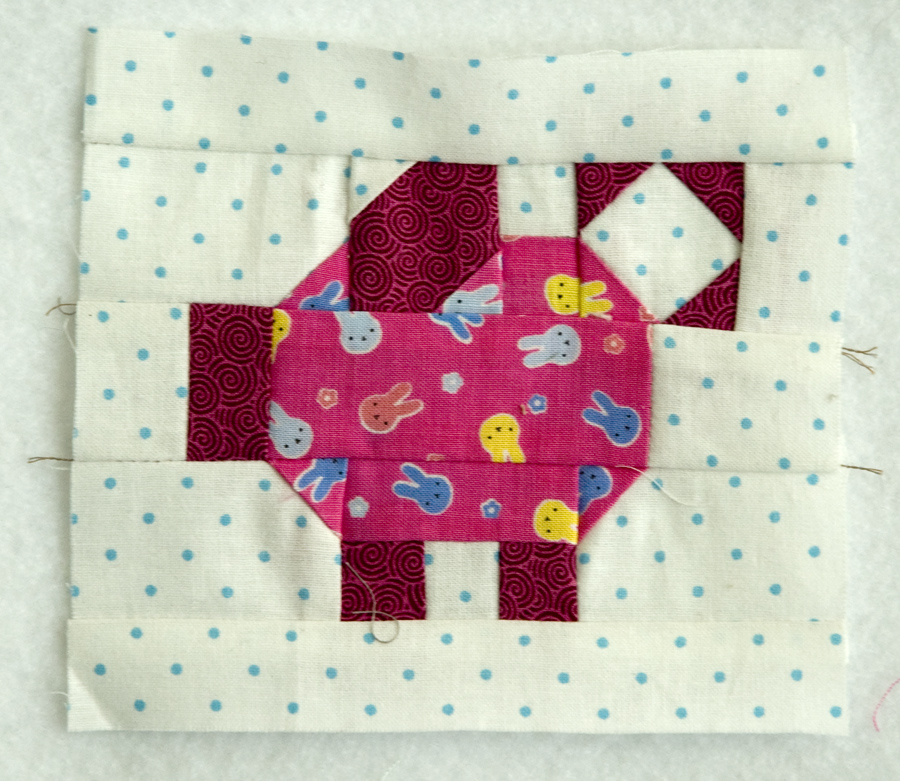
Angela's Tiny Tuesday, Piglet edition. Today we're going to stuff a piglet into a 4.5 inch finished block. And for those of you who may be hyperventilating, there is a second option of a fish block...you know, in case you want the healthier option. That said, this little piggy isn't as hard at it looks and will come together faster than you may expect. So let's get started.
The Micro Piglet uses three fabrics: a background, a dark pink and a lighter pink. For the background fabric cut three 1.5 by 2 inch rectangles, two 1.5 inch squares, one 1 by 6 inch strips and two 1.25 by 5 inch strips. (In the photo, the strips look the same width...but that was a mistake I made...please move on...).
For the light pink, cut six 1 inch squares, one 1 by 2 inch strip and a 1.5 by 3 inch rectangle.
For the dark pink, cut a 1 by 2.5 inch strip, four 1 inch squares and one 1.5 inch square.
First, cut a one inch square off of the 1 by 6 inch strip. This will be used for the top of the pig's ear.
We will make the piglet's ear by taking the 1.5 inch square of dark pink fabric and using the 1 inch square of background fabric to make a flip triangle in the upper left corner and using a 1 inch square of light pink fabric in the lower right corner.
A flip triangle is a square sewn diagonally in the corner and ironed over to make a triangle. After sewing, there are three layers of fabric, two of which have the tips removed to reduce bulk.
In the second photograph, the ear is the bottom square on the far left.
And now let's do the most intense step...making a curled pig tail...this requires putting four flip triangles on a 1.5 inch square of background fabric. In this case, three of the flip triangles are 1 inch squares of dark pink and one is a one inch square of light pink. It's hard to see all the layers in the second photograph, but its the one at the top far left.
The easiest approach is to attach a flip triangle, finger press it and trim, then add another flip triangle, finger press and trim etc. until the four flip triangles are sewn.
After that, it will be super easy to sew a one inch light pink flip triangle to each of the 1.5 by 2 inch background rectangles. But it matters very much which corner you attach it to. Two rectangles have the flip triangle on the top left side, and one has it on the top right side.
And now we'll use strip piecing to make sewing tiny pieces easier. Sew the 1 by 2.5 inch strip of dark pink to the one inch wide strip of background fabric. Right behind it sew on the 1 inch square of light pink. (Please note that at this point that longish strip is five inches because you cut an inch off of it in the first step.)
After sewing and pressing (lightly!), go ahead and cut the dark pink strip set from the light pink square.
Cut the dark pink strip set into one 1.5 inch length (the pig's snout) and one 1 inch length (a pig leg). Cut the light pink strip set from the rest of the background strip...but save it for another step!
The 1.5 inch strip set will be the piglet's snout. Sew another dark pink 1 inch square to the background side of the next strip set to make the piglet's feet. The third strip set with light pink is the piglet's back.
Sew the background strip remnant to the side of the pig tail...place it so the light pink is in the lower left corner. You can see this finished in the photo below...in the top right corner.
Rearrange all of your pieces and place them in their proper pig places as shown above. After you complete this puzzle, you will sew the four seams with arrows pointing to them...that is, the forehead to the ear, the tail to the back, the nose to the body and the feet to the tummy.
Wow! The piglet is coming together fast! The next four seams are shown above with arrows: the back to the back of the ear, the 1.5 inch square of background to the body, the front of the tummy to the front leg section and the bacon to the back leg section.
Now sew the three piglet rows together.
Last but not least add the 1.25 by 5 inch strips of background fabric to the top and bottom to make the piglet five inches square unfinished.
Now that was easier than you thought...wasn't it? If right about now you are screaming, crying or pouting...maybe you would prefer some fish...
And let's at least make TWO fish swimming in opposite directions.
You will be making TWO fish, so do this twice: cut six 1.25 inch squares of background fabric and a 2 by 2.75 inch rectangle of background fabric. From pink fabric, cut a 2.75 inch square and a 1.25 by 2.75 inch rectangle.
Using the 1.25 inch squares of background fabric, sew four flip triangles to the corners of the large pink square. Next sew two flip triangles to the 1.25 by 2.75 inch rectangle of pink. Watch the direction of the flip triangles...you want them to make a tail fin.
After ironing the triangles back and trimming, you will have three pieces for each fish...the body, the tail and some swimming room. And yes, I am showing how to make one, but for the Tiny Tuesday block you will need TWO fish.
Sew the body of the fish its tail. Then sew the large rectangle of background fabric to the fish's tail.
You should have two fish that can swim in either direction.
Keep watching the fish swim until you notice that the bottom fish has turned and has started to swim in the opposite direction. Catch them quickly and sew them together.
You will now have your Tiny Tuesday block finished. And while you're pleased with your accomplishment, you might want to reconsider and make a piglet. It's just a suggestion.