Wednesday, August 31, 2016

Dear Jane J6

Here is Dear Jane block J6 or Granny Weaver.

Buddy thoroughly enjoyed playtime with a new mouse toy. He, however, did not like picture time.

Tuesday, August 30, 2016

Monday, August 29, 2016

Dear Jane D2 and Alternate Revisited

This is Dear Jane Block D2 or Mouse in the Mirror. I think I got it mixed up with Bread Basket. But I guess we'll assume that the Mouse ate the Bread and is now checking himself out in the Mirror. I didn't construct this as specified by either Jane or the Dear Jane book. Instead I broke it down so I could use strip piecing.  I can see some parts are a bit catawampus, but that might be appropriate for a mousie block.

With the new owl addition, I thought I should also see how the Alternate Jane Stickle Universe is progressing.

Sunday, August 28, 2016

Dear Jane C7

This is Dear Jane block C7 or Megan's Mountain Laurel. For those of you on team "I'll never make a Dear Jane quilt," this is probably the block you should point to as justification. It starts out simply enough with a big chunk of real estate in the middle, but even I resorted to paper piecing for the pieced diamond border. So you know I wasn't happy. And then when you've truly had enough of this block, you have four diamonds to applique.

On a positive note, I do kind of see why it was called Mountain Laurel. This blooms like crazy throughout the woods around my house in May.


In other news, Buddy may be trying to become a cat. The other day he puffed up and danced sideways. Molly and I couldn't stop laughing because there is nothing funnier than a dog doing terrible cat impressions. But today he jumped up on the cutting table to show he was serious. He had never jumped up there before and I think he even surprised himself.  He usually hangs out below while Molly knocks things down on his head. And finally to really prove his point, he came up to me for a cuddle then changed his mind and sauntered away. Another first.

Saturday, August 27, 2016

Purple Applique Owl

Here is my last purple contribution to the Rainbow Scrappy Challenge for the month of August. This little owl is applique and finishes at 4.5 inches. The applique owls first came about as part of the collection of Alternative Universe Jane Stickle blocks, that is, the blocks Jane Stickle made but didn't include in her now famous quilt.

And here are all the applique owls I've made so far this year...Hey Wait!

Oh dear. He looks a bit googly-eyed like a GMO experiment gone wrong.

Yes, I'm looking at you...the giant green owl from last year that has been languishing as a partial quilt top...

Oh wait, here it is in the Compendium of Alternative Jane Stickle blocks. This is Block W64 or Googly-eyed Owl. Now you might want to find your way back to pleasing purple and the Rainbow Scrappy Challenge.

And if you're wondering about what Molly is up to...yes, she has literally gone to the dogs in her grief. The voting over at Pets on Quilts is quite public and Molly has been devastated to see people she knows and loves voting for the likes of Rocky McFakeyFace and Sadie McWormyPants.  Molly would just like to mention that if Rocky's face were real, no one would bother taking pictures of kittens. And my ears are still ringing from what she had to say about Sadie.

Friday, August 26, 2016

Poodle Party: Poodle Tutorial Part 2, Left-facing Poodle

On Tuesday, I gave a tutorial on how to make a right-facing poodle. And now we'll go into how to make a left-facing poodle so they can touch noses.  Because there are a lot of flip triangles in this block, a lot of the building blocks will be different. However, all of the fabric requirements and cutting instructions for the background, dark and light fabric are the same. Also, the first tutorial provides more detailed step-by-step instructions. So you will want to work through that tutorial first.

And here's the poodle that we're making today.

We start with the ear, tail poof and the leg poofs. In the first tutorial, this was referred to as the dark fabric. (This time it's a bit lighter in value than the "light" fabric, but Molly said I could go ahead and be reckless.) The sewing for these parts are the same except for the ear. Because the poodle is facing left, the white flip triangle is on the upper right hand corner.

Here are the ear and poofs after they have been sewn, ironed and trimmed.

Here are the pieces for the main part of the poodle. Again, since it is facing left, the muzzle is the far left 2.75 inch square.

Here are the main body parts showing where the flip triangles go and the direction of the sewing. The black square in the upper left hand corner of the muzzle is the nose.

Here are the main body parts after they have been sewn, ironed and trimmed.

These are the background sections that sit right above poodle's back and that sit right below his belly.

Here are the background sections after they have been sewn, ironed and trimmed.


As you can see, I got a bit ahead of myself. These are the white background border pieces where I have already sewn on the flip triangles/strip piece, ironed them and trimmed them as needed.

And finally,  here are the extra pieces. On the far left is the eye. Next to it is a strip that gets sewn to the front of the ear. To the right of that is a background piece with a flip triangle--this goes with the poodle's tail. And on the bottom row is a pair of strips that will be used for the poodle's front leg.

Now that the building blocks are completed, the poodle will go together lickety-split. Sew the seams together where you see the pink arrows.

And now there are five seams to sew.

Okay, two more seams.

And this is the last step with four seams where you will be sewing border sections to the main body. Starting with the tail section, work around the poodle in a clockwise direction.

And now your right-facing poodle has a left-facing friend.

Thursday, August 25, 2016

Dear Jane Block E3

Here is Dear Jane Block E3 or Paddle Wheels. When I saw how Fabadashery interpreted this block, I found it much more inspiring and followed her lead of using a dark and medium fabric in addition to the background fabric. Most of the Dear Jane blocks are simply two color blocks. But they can really come alive with different placements of value.

Also, I am working on the tutorial for the left-facing poodle and hope to have him posted tomorrow.

Wednesday, August 24, 2016

Tuesday, August 23, 2016

Poodle Tutorial: Right Facing

This poodle finishes at 13.5 inches square and is based on a .75 inch grid.

There are four fabrics: the white background, the dark turquoise, the light turquoise and the black for the eye and nose. I'll refer to these as white, dark, light and black.

Also, as with most of my patterns, I use a lot of flip triangles...squares of fabric placed in the corner. The square is sewn onto the corner along the diagonal...but moved over just a thread's width towards the corner. When the flap is ironed over, you will have a triangle. You will also have three layers of fabric. Trim the bottom triangles a quarter inch from the seam line.

For each fabric, you will cut different size strips...and then from these you will cut more precise poodle parts.

Black fabric: Cut two 1.25 inch squares.

Dark fabric: From a 2.75 inch strip,

cut three 2.75 inch squares
cut one 2.75 by 4.25 rectangle (for the ear)

Light fabric: From a 3.5 inch strip (at least 16 inches long)

cut two 2.75 inch squares
cut two 2.75 by 3.5 inch rectangles
cut one 3.5 by 5 inch rectangle
cut one 2 inch square

From a 1.25 inch strip (at least 28 inches long)

cut ten 1.25 inch squares
cut four 1.25 by 2 inch squares
cut one 1.25 by 2.75 inch rectangle
cut one 1.25 by 4.25 inch rectangle
(for the last couple, you don't have to cut to size, but you use strip piecing where you sew the strip, then trim. I have it cut to size only to make the tutorial easier to understand.)

White background fabric: From a 3.5 inch strip (at least 27 inches long)

cut one 3.5 by 9.5 inch rectangle
cut three 3.5 by 5 inch rectangles
cut one 3.5 by 2 inch rectangles

From a 2.75 inch strip (at least 23 inches long)

cut one 2.75 inch square
cut one 2.75 by 8.75 inch rectangle
cut one 2.75 by 2 inch rectangle
cut one 2.75 by 6.5 inch rectangle
cut two 2.75 by 1.25 inch rectangles

From a 1.25 inch strip (at least 22 inches long)

cut twenty 1.25 inch squares

You just finished the hard part. Now we're going to make the poodle building blocks. To make this easier to follow, we're going to build these in four sections: Dark, Light, White Inner, White Border and Extras.


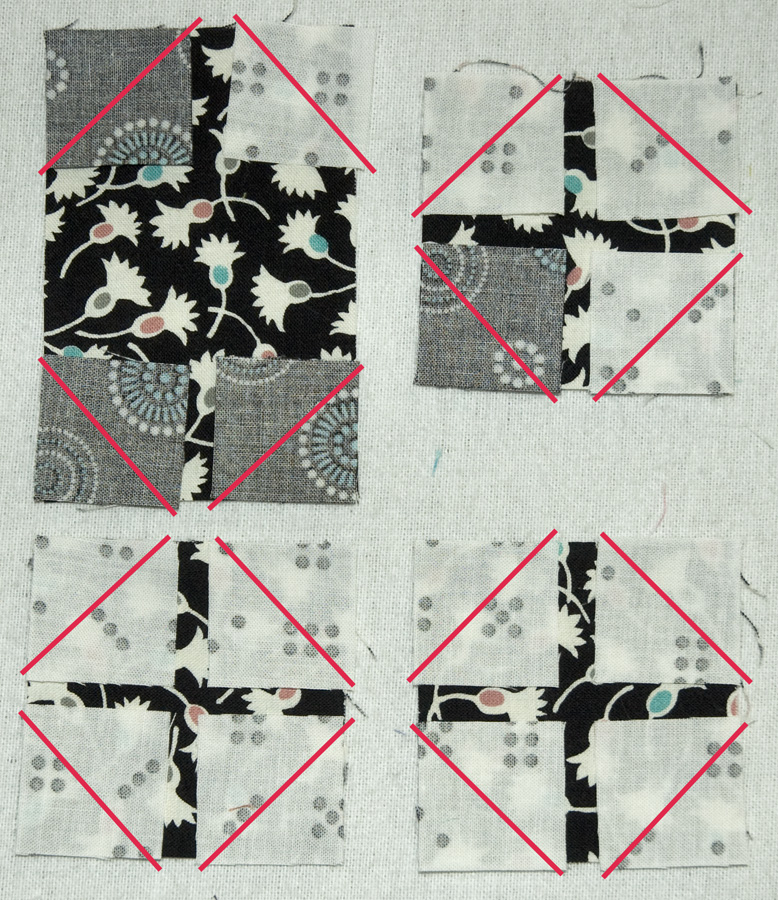
These are the dark fabric poodle pieces.

For the ear piece, I have the flip triangle pieces off to the side so you can see the colors. You will want to place them right side down on the ear and sew through the diagonal (but a thread's width toward the corner so there is room to iron over your seam). Essentially you are making three snowballs and a lozenge. 


 After sewing on the flip triangles, you will iron back the flaps. If you sewed a bit off of the diagonal (hopefully it was erring toward the corner), match the corners to the back rectangle or square and iron it as if you had sewn it correctly. If you erred and went closer to the center, bring out your friend the seam ripper. Then carefully trim away the bottom two triangles leaving about a quarter inch seam.

Now for the light fabric:


 Now let's make parts from the white background fabric. First, let's work with the white sections that are right above the poodle's back and the one right under his belly.


Now let's lay out the white background border pieces and make those building blocks. When laying these out, its helpful to think of it like a clock and moving clockwise from the upper left corner.


 And now there are just a few extras but special parts like the eye...

That white piece of fabric under the eye parts is just placed there to make the pieces easier to see for the tutorial...its not a piece that you'll be using for the poodle.

Now let's assemble all of these poodle parts into something that resembles a poodle. I think you'll be surprised to see how fast it comes together now.


These are all the parts you've constructed so far. You're so close to being finished you can almost hear him bark.


The pink arrows show which seams to sew together during this first pass. I pile up the pieces and chain piece.

And here's a little trick for getting precision when you're sewing two flip triangles. Typically, we iron the flap over so all of the flip triangle seams are facing toward the corner. When you find yourself sewing two flip triangles on top of each other like when you're sewing the leg poof to the foot...flip on the seams in the other direction, and nestle those two seams together just like a four patch. Precision made simple!

Reassemble your poodle and you can see that its almost ready to go for a walk.  Now sew the muzzle to the border piece under it. Sew the front leg to the border piece behind it. Sew the back leg to the border piece behind it. And sew the hind end bits to the tail poof. Sew the ear section to the main body section. 

 Now your poodle looks like this.

Now sew the leg sections together and add the piece under the belly to the main body section as shown by the pink arrows.

At this point, its probably obvious and you've gone on ahead without me. And if you'd like to speed ahead, don't let me stop you. The next sections will be sewn counterclockwise, starting with the tail.

He's wagging his tail!

He's prancing!

He's putting his nose where it doesn't belong!

He's finished! Now give him a name and don't forget to train him.